 |
| Top 3 Popular Posts Widgets for Blogger |
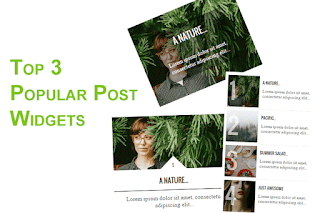
Visitors are always keen to know what is trending on the blog they land. Every Blogger,knowing this, certainly show those trending items to them with a Popular post widget.In Blogger, We get a default popular post widget but who likes the default ones. So,we look forward to change it in to something unique and professional.
These 3 cool looking Popular post widget also contribute in reducing and stabilizing bounce rate of our blog. There are a lot of different popular post widgets that you can get by Googling. Here, we have top 3 best fast loading, awesome popular post widgets with thumbnail.
Installation steps are at the bottom of this post.
1. Popular Post Widget - Numbered Images
How about a clean and numbered popular post widget ?. This style looks too neat and well organised. There is summary, images numbered with the order and heading.
 |
| Top 3 Popular Posts Widgets for Blogger |
CSS Code:
<style type='text/css'>.sidebar .PopularPosts ul {counter-reset: popularcount;margin: 0;padding: 0;}.sidebar .PopularPosts ul li {float: left;max-height: 130px;min-width: 250px;position: relative;}.sidebar .PopularPosts .item-thumbnail::after {color: rgba(255,255,255, 0.63);content: counter(popularcount, decimal);counter-increment: popularcount;font: 70px 'Oswald', sans-serif;list-style-type: none;position: absolute;left: 5px;top: -5px;z-index: 4;}.sidebar .PopularPosts .item-thumbnail::before {background: rgba(0, 0, 0, 0.3);bottom: 0px;content: "";height: 100px;width: 100px;left: 0px;right: 0px;margin: 0px auto;position: absolute;z-index: 3;}.sidebar .PopularPosts .item-thumbnail a {clip: auto;display: block;height: auto;overflow: hidden;}.sidebar .PopularPosts .item-thumbnail {width: 100px;height: 100px;margin: 0px 10px 0px 0px !important;position: relative;}.sidebar .PopularPosts .item-thumbnail:hover:before {display: none;}.sidebar .PopularPosts .item-thumbnail img {position: relative;padding-right: 0px !important;height: 100%;width: 100%;object-fit: cover;}.sidebar .PopularPosts .item-title {font: 13px 'Oswald', sans-serif;text-transform: uppercase;padding: 0px 5px 10px;}.sidebar .PopularPosts .item-title a {color: #000;text-decoration: none;}.sidebar .PopularPosts .item-snippet {font: 13px "Times New Roman",Times,FreeSerif,serif;}.sidebar .PopularPosts .widget-content ul li {padding: 0px 5px 0px 0px !important;}.sidebar .PopularPosts .item-content {padding: 5px 0px;border-bottom: 1px dotted #dedede;overflow: hidden;height: 100px;position: relative;}</style>
2. Popular post widget - Box in a Box
Loved the last one but hated the numbers and could have been stunning with some upgrades ? Then, this is for you. This Popular post widget is widely used by bloggers.The transparent part is the most lovely one. It truly is an eye-catching one. This style implies creativity. You love, You add.
 |
| Top 3 Popular Posts Widgets for Blogger |
CSS Code:
<style type='text/css'>.sidebar .PopularPosts ul {margin: 0;padding: 0;}.sidebar .PopularPosts ul li {list-style: none !important;padding: 0 !important;margin-bottom: 10px;}.sidebar .PopularPosts .item-thumbnail {height: 190px;margin: 0;overflow: hidden;width: 100%;}.sidebar .PopularPosts .item-title {position: relative;}.sidebar .PopularPosts img {height: 100%;width: 100%;object-fit: cover;}.sidebar .PopularPosts .item-title a {color: #FFFFFF;font: 15px 'Oswald', sans-serif;text-transform: uppercase;font-size: 20px;padding: 10px;position: absolute;right: 0;left: 0px;margin: 0px auto;text-align: center;text-decoration: none;top: 40px;width: 60%;height: 26px;overflow: hidden;z-index: 2;}.sidebar .PopularPosts .item-snippet {background: rgba(0, 0, 0, 0.35);border-top: 6px solid rgba(0, 0, 0, 0.1);border-bottom: 6px solid rgba(0, 0, 0, 0.1);color: #FFFFFF;left: 0px;right: 0px;margin: 0px auto;padding: 65px 10px 10px;position: absolute;font: 13px "Times New Roman",Times,FreeSerif,serif;text-align: center;top: 35px;width: 60%;z-index: 1;}.sidebar .PopularPosts .item-content {position: relative;}</style>
3. Popular post widget - Thumbnails with text below
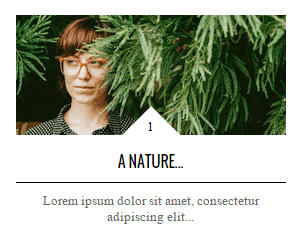
The perfect choice for a minimal template. The previous one looked so nice. But if you feel the transparency cannot match your blog then this is the best choice.
 |
| Top 3 Popular Posts Widgets for Blogger |
CSS Code:
<style type='text/css'>.sidebar .PopularPosts ul {counter-reset: popularcount;margin: 0;padding: 0;}.sidebar .PopularPosts ul li {width: 100%;list-style: none !important;padding: 0 !important;margin-bottom: 20px;position: relative;border: 0;}.sidebar .PopularPosts .item-thumbnail a {clip: auto;display: block;height: auto;height: 120px;}.sidebar .PopularPosts .item-thumbnail {width: 100%;position: relative;margin-bottom: 15px;}.sidebar .PopularPosts .item-thumbnail::before {background: rgba(0, 0, 0, 0) none repeat scroll 0 0;border-bottom: 29px solid #fff;border-left: 29px solid transparent;border-right: 29px solid transparent;bottom: 0px;content: "";height: 0;width: 0px;left: 0px;right: 0px;margin-left: auto;margin-right: auto;position: absolute;z-index: 3;}.sidebar .PopularPosts .item-thumbnail:after {color: #000;content: counter(popularcount, decimal);counter-increment: popularcount;font: 13px "Times New Roman",Times,FreeSerif,serif;list-style-type: none;position: absolute;bottom: 0;text-align: center;margin: 0px auto;left: 0px;right: 0px;z-index: 4;}.sidebar .PopularPosts .item-thumbnail img {position: relative;width: 100%;height: 120px;object-fit: cover;}.sidebar .PopularPosts .item-title {font: 15px 'Oswald', sans-serif;text-transform: uppercase;text-align: center;margin: 0px auto;padding-bottom: 10px;border-bottom: 1px solid #000;}.sidebar .PopularPosts .item-title a {color: #000;text-decoration: none;}.sidebar .PopularPosts .item-snippet {padding: 10px 15px;font: 13px "Times New Roman",Times,FreeSerif,serif;text-align: center;}</style>
How to Install:
- In layout tab, Add a Popular post widget at any place (skip if you already have one)
- Open Template tab and click on Edit HTML.
- Press Crtl + F and search for the following
</head>
- Enter the CSS code of your style above it.
- Then, search for <head> and add the below code above it.
<link href='https://fonts.googleapis.com/css?family=Oswald:400,700' rel='stylesheet' type='text/css'/>
- Search for </body> and enter the following code above it.
<script src='//ajax.googleapis.com/ajax/libs/jquery/1.11.1/jquery.min.js'/>
<script type='text/javascript'>
$('.popular-posts img').attr('src', function(e, t) {
return t.replace('/w72-h72-p-nu/', '/s350-c/')
});
$('.popular-posts ul li .item-snippet').each(function(){
var txt=$(this).text().substr(0,60);
var j=txt.lastIndexOf(' ');
if(j>10)
$(this).text(txt.substr(0,j).replace(/[?,!\.-:;]*$/,'...'));
});
$('.popular-posts ul li .item-content a').each(function(){
var txt=$(this).text().substr(0,60);
var j=txt.lastIndexOf(' ');
if(j>=6)
$(this).text(txt.substr(0,j).replace(/[?,!\.-:;]*$/,'...'));
});
</script>
- Save Template and see your upgraded Popular post widget.
Conclusion
Now you have the best popular post widgets for blogger. You can edit, alter and manipulate them as you wish. It's completely up to you. The choice is yours. If you think that these could have been better with some edits, share it with us. Comment your feedback and expressions. Let your friends know about this.
Happy Blogging :)

Nice Blog...
ReplyDeleteThanks
Thank you ☺
DeletePost a Comment